Circular chromatography
Contents
Introduction
  CHROMATO = colour; of or in colours

  GRAPHY = writing...representing...or a process, or art / science working with such a process
Chromatography is a way to analyse what is in a mixture (in this case liquid) - by separation on solid support (in this case paper), and visualization in this case, by a photographic process.
"The mixture flows though a medium and the individual substances that make up the mixture are deposited at different distances from the point of inflow." - from website of Bio-dynamic Society of India
Because we did this on a circular piece of paper, it is called circular chromatography. It can also just be called paper chromatography, because we use paper as a support.
In this case, we took some soil and mud samples we had collected in different water bodies locations, and tried to analyse the humic content of the samples.
This method can be applied to any other liquid mixtures.
Methods
This is based on our experience trying out the recommended protocol from the page of BIO-DYNAMIC ASSOCIATION OF INDIA
The original steps from Biodynamic Association of India:
  1. A circular filter paper (Whatman #1) with a cylindrical paper wick sitting in a 0.5% solution of silver nitrate is allowed to absorb the solution, which spreads by capillary action, to a certain diameter.
  2. The wick is removed and the paper is dried.
  3. Meanwhile, the substance to be tested is mixed with a 0.1 to 1% solution of sodium hydroxide and let stand for a period of time.
  4. The prepared filter paper is then allowed to absorb this solution and the substance spreads over the paper.
  5. When it has spread to a certain distance, the wick is removed and the paper dried. The paper is then exposed to indirect sunlight to let the image develop.
Materials
Chemicals
- 0.5% solution of silver nitrate (you can find in photography suppliers)
- 0.1 to 1% solution of sodium hydroxide (NaOH, otherwise known as lye or caustic soda - be careful, because it can burn)
Other materials
- paper (Whatman, or any acid-free thick paper)
- reservoir
- wick (medical cotton, and rolled it into a wick)
- light for development - sunlight is fine unless controlled exposure is wanted
Step by Step
DAY1
Extraction
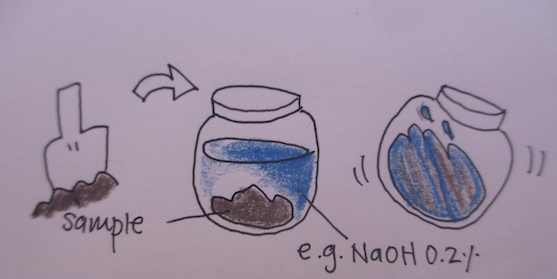
This is the step where we take our samples we want to analyse, and extract what is in it into a liquid phase.
Just like taking a crushed piece of garlic, and putting it into water or oil, brings out different flavors in the water and oil, we decided to see what will be extracted from the soil samples when using 2 different solutions.
- 0.2% NaOH in water
- isopropyl alcohol
- Take one spoon scoop of soil/mud into petridish to mix and extract with NaOH.
- The same scoop of soil/mud into a tube to extract with isoproypl alcohol (it evaporates faster). Here, it may be best to put both in a closeable container, so we can mix and shake the samples.
- Leave the samples overnight at room temperature.
- For better controlled experiments -
- Weigh out equal amounts of soil
- Shake constantly
- Constant temperature during extraction
- Consistent amount of time during extraction
- For better controlled experiments -
DAY2
Preparation of Light sensitive paper
Sample application
Exposure to see the different bands
Which method to use
- Bio Crystallisation, copper chloride crystallisation, proteins
- Capillary Dynamolysis, vertical filters, ‘rising pictures’, sugars/ bitter materials
- Bio Chromatography, horizontal circular images, minerals, sugars/ bitter materials
